
Recently we decided to beef up our bland ikea furniture a bit. The victim was an expedit rack that we use as a hi-fi rack in our living room. I am a huge fan of pixel art and would cover my whole appartement in 8-bit if I could. Anyhow, as we wanted it to be something that is functional and nice to look at, we decided the only reasonable thing to do is to cover the whole rack with a curtain of dice.
From a functional perspective, this had two benefits. First it stabilised the rack by making it heavy and rigid, which makes it a perfect base plate for a vinyl player. Secondly it hides the mess in the rack. I have to be honest. Mess is inevitable and good cover techniques are vital sometimes. In any way, we also wanted something that is a bit unusual, interesting, but a pleasure to look at.
We finished it for quite some time now and are really happy with the results. As this little exercise however was quite simple and as it didn't take any time to jazz up the hi-fi rack, I quickly wanted to note down the process we went through.
Step 1:
At first, we chose an appropriate image. Essentially, we wanted a picture that is easily recognizable in a low resolution as we didn't want to the picture to cover our whole appartement. Moreover, the space on the little expedit rack was actually quite limited, so the image needed to stick out. Finally and most importantly, it should be something nice to look at, so we were test driving a lot of images. We started with something like this:

Step 2:
Using the Pixastic library we built a javascript based prototype (that you can find online here). Basically, we converted a variety of images into a monochrome version, scaled it down to a resonable amount of pixels and subsequently posterized the image to 6 levels of grey that we could easily replace with one of the faces of a die. This is how the intermediate step looks like:

Step 3:
In a final step, we replaced every grey pixel within the image with its counterpart symbol for the face of the dice. This way, we ended up with a map of how to place all the dice of the expedit panels. All in all the whole project took us about two tinkernights. One day coming up and playing with the tool as well as deciding for the final image. The other night we spent on glueing the image to the panels. Quick and easy. The map for the example image would like something like this:

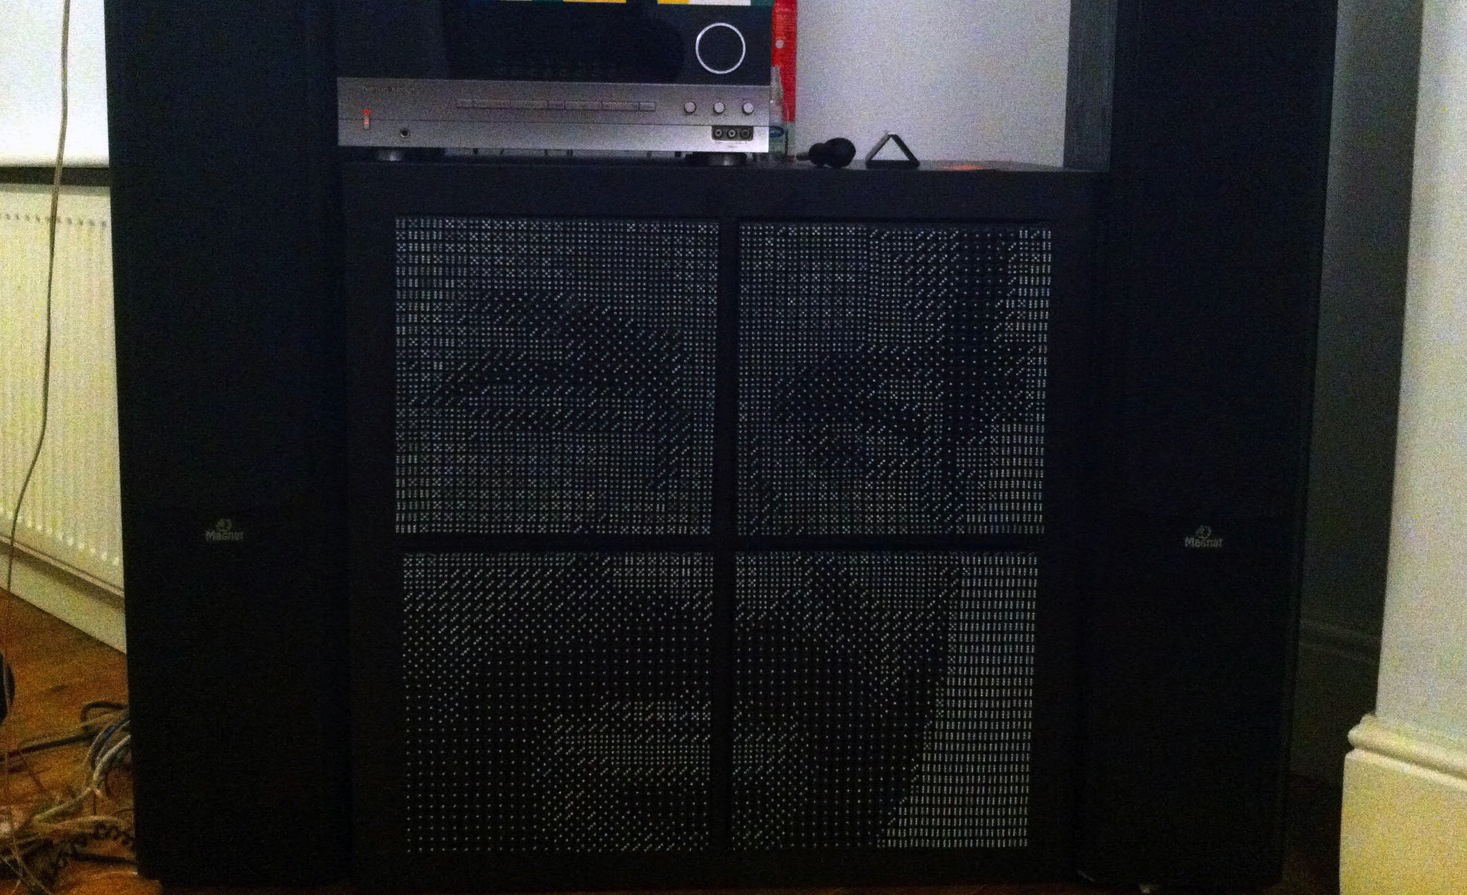
Our final rack:
Finally, we had long discussions who would be best to decorate our new rack. Personally I am a big fan of italian spaghetti-western uber hero Bud Spencer, so the decision was quite easy. However, everything we were looking for was a picture that comes with a clear contrast and a pleasant smile. The overall cost for this project was about 90 Euros, for about 3000 dice (we found cheap remnants on ebay) and 4 expedit panels.
And this is it:

The tool
For your own pleasure and convenience, you can play with the tool live on: http://brauer.tv/downloads/dice/ to dice any picture on the web you like. If you're thinking about making changes to the code to adjust it for your own tinkerings, you are also more than welcome to downloaded the source files here:
It’s absolutely wonderful, I think I’ll do the same.
Where did you find so many dices for such a cheap price ? Because ven on Ebay, I can’t find something sooo cheap !
I played with this a fair bit today to make it easier for others to use. Now it can load external images (you dont need to download the code yourself), can show with die colored white, black or both and is using a die image rather than the font approach for better compatability:
http://demos.earthware.co.uk/dicemosaic/
Could still be a lot cleverer but its a start
Hello,
I changed the font in the index.html file to “Segoe UI Symbol Regular”, but it’s still not working. Does anyone know how to fix this?
Thanks
those who cannot get it to work may have the problem I had which is not many fonts on my pc (and definately not the one it was defaulting to) had the symbols for the dice faces. Checkout http://www.fileformat.info/info/unicode/font/fontlist.htm?text=%E2%9A%80+-+Unicode+Character+%27DIE+FACE-1%27+%28U%2B2680%29
To find which ones do and change to code to use that, took a bit of tweaking to display properly
http://www.facebook.com/#!/eatsmartweb
Hi Robert,
I discovered your work with the dice on the ikea expedit and I fell down before this wonder!
I read the tutorial to get the same results with our own photos.
The problem is that I am new to computing! I tried but to no avail!
my question is:
Can you make a tutorial video or ideal to convert me a picture?
I think you can be other things to do or simply do not want, but I thought I had nothing to lose you make this request!
Hoping to have an answer, which is what I send you my utmost respect.
Hello, congratulations on this project! very cool!!!
Can you post more info about the dice size and maybe an ebay link
idea is awesome, but tool doesn’t seem to be working for me on latest chrome, moz 3.6 or IE9, what browser do you recommend?