November 1, 20118 Comments

Hacking Expedit

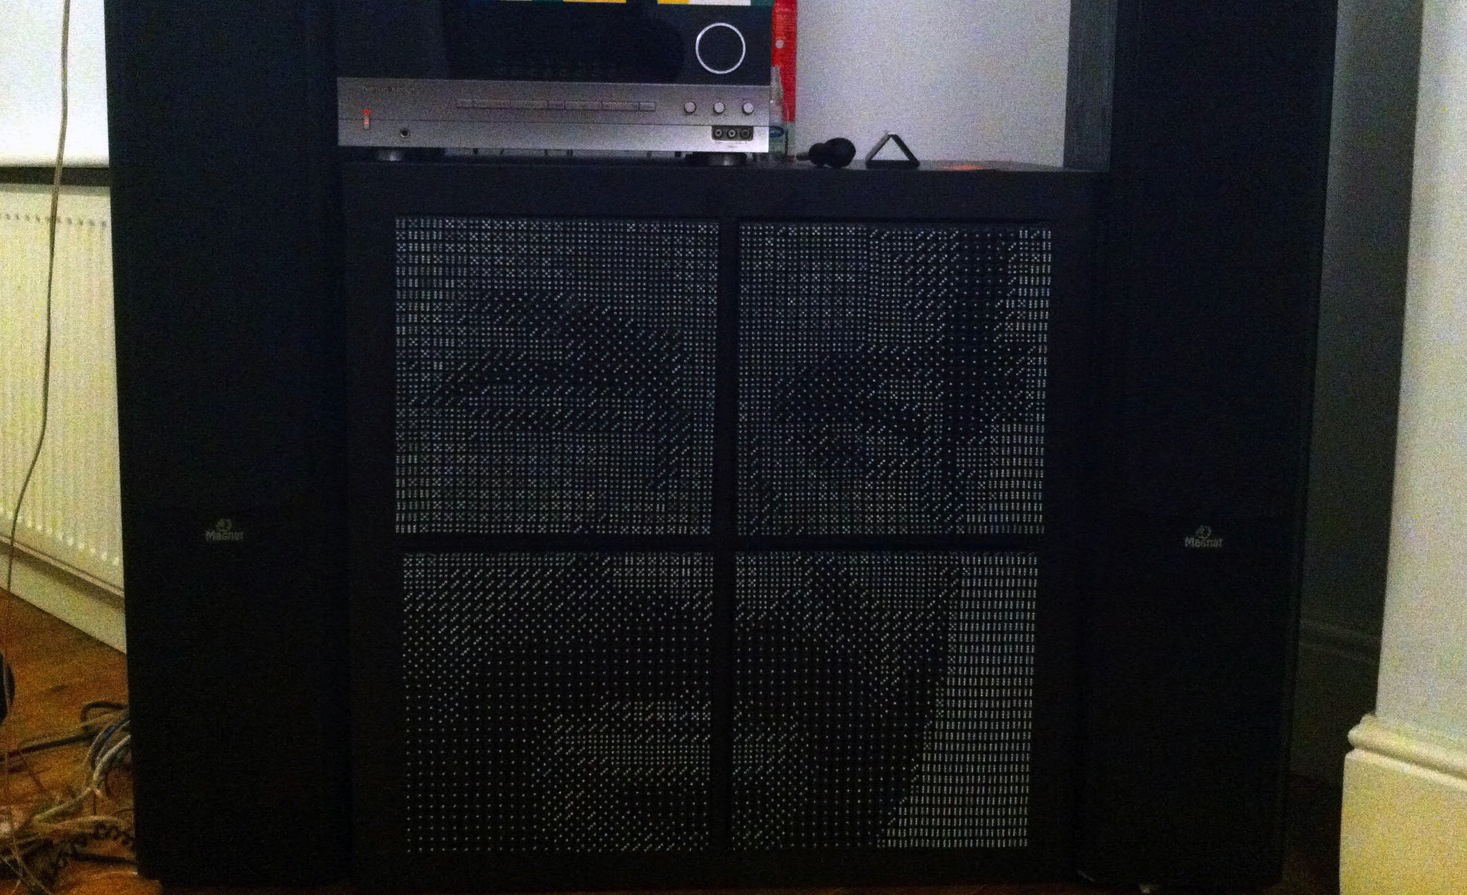
Recently we decided to beef up our bland ikea furniture a bit. The victim was an expedit rack that we use as a hi-fi rack in our living room. I am a huge fan of pixel art and would cover my whole appartement in 8-bit if I could. Anyhow, as we wanted it to be something that is functional and nice to look at, we decided the only reasonable thing to do is to cover the whole rack with a curtain of dice.

From a functional perspective, this had two benefits. First it stabilised the rack by making it heavy and rigid, which makes it a perfect base plate for a vinyl player. Secondly it hides the mess in the rack. I have to be honest. Mess is inevitable and good cover techniques are vital sometimes. In any way, we also wanted something that is a bit unusual, interesting, but a pleasure to look at.

We finished it for quite some time now and are really happy with the results. As this little exercise however was quite simple and as it didn't take any time to jazz up the hi-fi rack, I quickly wanted to note down the process we went through.

Step 1:

At first, we chose an appropriate image. Essentially, we wanted a picture that is easily recognizable in a low resolution as we didn't want to the picture to cover our whole appartement. Moreover, the space on the little expedit rack was actually quite limited, so the image needed to stick out. Finally and most importantly, it should be something nice to look at, so we were test driving a lot of images. We started with something like this:

Step 2:

Using the Pixastic library we built a javascript based prototype (that you can find online here). Basically, we converted a variety of images into a monochrome version, scaled it down to a resonable amount of pixels and subsequently posterized the image to 6 levels of grey that we could easily replace with one of the faces of a die. This is how the intermediate step looks like:

Step 3:

In a final step, we replaced every grey pixel within the image with its counterpart symbol for the face of the dice. This way, we ended up with a map of how to place all the dice of the expedit panels. All in all the whole project took us about two tinkernights. One day coming up and playing with the tool as well as deciding for the final image. The other night we spent on glueing the image to the panels. Quick and easy. The map for the example image would like something like this:

Our final rack:

Finally, we had long discussions who would be best to decorate our new rack. Personally I am a big fan of italian spaghetti-western uber hero Bud Spencer, so the decision was quite easy. However, everything we were looking for was a picture that comes with a clear contrast and a pleasant smile. The overall cost for this project was about 90 Euros, for about 3000 dice (we found cheap remnants on ebay) and 4 expedit panels.

And this is it:

The tool

For your own pleasure and convenience, you can play with the tool live on: http://brauer.tv/downloads/dice/ to dice any picture on the web you like. If you're thinking about making changes to the code to adjust it for your own tinkerings, you are also more than welcome to downloaded the source files here:

January 26, 2011No Comments

Learn Something Every Day


Learn Something Every Day is a brilliant project. Every day the folks at Young put out a new fun fact skit that amuses me a lot. Though I do look at their site on an almost daily base and even subscribed to their feed, I was wondering if their might be a somehow ubiquitous way to integrate these little units of mental candy into an everyday.

That's why they can now be streamed to a Chumby.

The final widget

After all this widget is nothing too fancy. It simply reads the LSED feed and creates some sort of slideshow displaying ten fact skits, one after the other. Beyond just watching and enjoying it you can also skip through the slides by clicking them.

Please, feel free to throw the widget on your chumby, dash, android or whatever. It is listed here in the free widget section of chumby.com.

For your own pleasure and convenience, the widget and all the source files can also be downloaded here:

But as some of you might be interested in playing with the widget to create their own, let me walk you through some of the modifications that had to be made.

Cobbling the widget

Basically the widget I created is a quick-n-dirty modification of the Sample RSS widget provided from the official chumby wiki. Essentially all magic worth highlighting is bundled in two methods that are displayed below. But let me explain the tricky parts...

First this widget is written in Actionscript 2, which is a somehow old way to steer flash movies. Unfortunately flash doesn't allow your widgets in general to load external ressources without the need of a little effort. To load external ressources, I had to put a crossdomain file and a little php file to proxy the feed as well as the images to the chumby.

After creating the proxy, essentially one method needed adjustment - loadItem(). Lines 5 to 11 show how an XML based feed is being traversed to distill the adress of the images. The the previously loaded image will be removed from the stage which brought up a very strange problem about removing movieclips. You can see the solution to it in lines 19 and 20. Finally a new clip will be created dynamically (see dynamic referencing in line 14) and loaded into the widget via a common MovieClipLoader. Once the image is loaded it will be tweened and adjusted to the widget and equipped with the skipping feature.

Here are the important code parts for reference:

1:  function loadItem(item)   
2: {
3: g_currentItem = item;
4: //dig in feed for image
5: var xmlData = new XML(item.firstValueOfType('content:encoded'));
6: xmlData.ignoreWhite = true;
7: var url = "";
8: for (i = 0; i < xmlData.childNodes.length; i++)
9: for (j = 0; j < xmlData.childNodes[i].childNodes.length; j++)
10: if(xmlData.childNodes[i].childNodes[j].attributes.src != undefined)
11: url = xmlData.childNodes[i].childNodes[j].attributes.src;
12: //fade out and get rid of the previous LSED image
13: var loader_mc:MovieClip =
14: _root["loader_mc"+(g_itemIndex - 1 < 0 ? g_items.length - 1 : g_itemIndex - 1)];
15: var alphaTweenHIDE:Tween =
16: new Tween(loader_mc, "_alpha", Regular.easeOut , 100, 0, 6, true);
17: alphaTweenHIDE.onMotionFinished = function()
18: {
19: if(loader_mc.getDepth() >= 1048575 || loader_mc.getDepth() <= 0 )
20: loader_mc.swapDepths(2000);
21: loader_mc.removeMovieClip();
22: };
23: //load new LSED image
24: var container:MovieClip =
25: createEmptyMovieClip("loader_mc"+g_itemIndex, getNextHighestDepth());
26: mcLoader.loadClip(makeURL(proxy+url),container);
27: }
28: function onLoadInit(mc: MovieClip)
29: {
30: var alphaTweenSHOW:Tween = new Tween(mc, "_x", Strong.easeOut , -330, 0, 3, true);
31: mc._yscale = 50;
32: mc._xscale = 50;
33: mc.onPress = function() { nextItem(); };
34: }

January 28, 2009No Comments

Face to Face


Here are some faces I once scribbled to add a kind of personal touch to a mobile soccer game. By dynamically combining several parts (skulls, noses, eyes and mouths) to a single face, it became feasible to generate a number of distinguishable field players at little cost. The whole trick does anyones brain by generally recognizing little variations in peoples faces.

Anyway... I have kept them to visualize ideas in several talks, to show interaction cycles or role-based systems. Please feel free to use them in any way you like, if they seem to be advantageous. Beyond that... feel free to drop me a line if you have enhanced the collection or successfully integrated them into one of your projects.

Download some pixel based faces as png
Download some vector based faces for Illustrator

July 12, 2008No Comments

Fastfood Software

A while ago Adobe announced their cross-platform Integrated Runtime environment for creating Rich Internet Applications.

To me this sounds like a perfect opportunity for rapid prototyping in software development or the creation of stuff I'd like to call Fastfood Software. These are tools utilized as daily problem solver but not that important one should spend a lot of time creating them. Reasons are trial and error issues or short time usage. Anyway... Playing with AIR I created a prompt for platformwide saving TODO's on toodledo - an essential GTD gadget.

Concerning FAST cooking, this is receipt:

  • A free Toodledo account with its REST interface for all the data stuff
  • The java Toodledo client made by Marc as code base
  • J2AS3 Java to Actionscript 3 converter translating the code Marc wrote
  • The as3 corelib e.g. for MD5 crypto feature needs
  • A nice Date Chooser made by Roy
  • Some graphics... basically Icons
  • And as bun some code I wrote wrapping it up and representing the app

That's rounding up to 3 hours of work for getting fully functional but simple software. Served Chilled.

FYI: For using Toodledo in program space I highly recommend using Fluid and nonimage's css hack for Toodledo Things style or Jake's Toodledo Quick Add for Firefox

April 12, 2008No Comments

Immersive Environments

Enhancing immersion of video games is a popular research topic along many disciplines. As the question of immersive environments came up in lectures some friends and me decided to build a simple jump'n'run like game concerning the interweaving of surrounding and gameplay into the design.

We came up with a little not-that-but-somehow-scary game called Fatalis and decided, although research seems to point into the direction of concentrating on senses that work more nearby (e.g. olfaction or sense of touch) rather than from those, working in distance (e.g. vision or audition).

Since we did not feel the need of ventilation after defeating a boss enemy we concentrated on increasing the visual and auditive experience by listening to and filming the ambience of the player and reacting to it, e.g. attracting enemies by noise.

Long story short. Based on the ideas of tile-based games in Flash we have created a isometric engine in AS2 that can easily be fed with xml-based descriptions of level and new textures. Please feel free to play with the code.

Download engine source snippets